Blog Archives
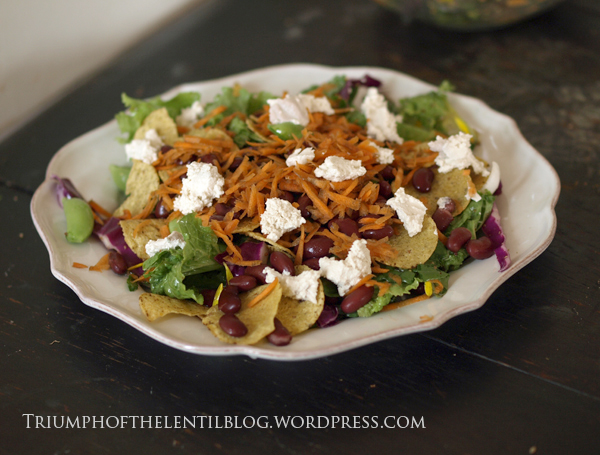
Nacho Salad
I like to eat salads for meals every now and again, typically if they have plenty of protein, fat and some carbs to make it more filling. This is a salad which has all of these things, but according to my other half it shouldn’t be called a salad, just ‘nachos’. Whatever it’s called, this is a satisfying meal that’s fast and easy to make, and perfect for hot weather.
Total time 10-15 minutes
Gluten-Free, Soy-Free, Nightshade-Free, Onion- and Garlic-Free Option, Under 45 Minutes
Serves as many as you want
Ingredients:
Dressing of your choice (for 2 adults and 2 children I use 3 tablespoons olive oil, 1 tablespoon apple cider vinegar, 1/2 tablespoon raw agave syrup, 1/2 tablespoon seeded or dijon mustard)
Leafy greens (eg. lettuce, rocket (arugula), miners lettuce, mizuna, mustard greens)
Heartier raw vegetables (eg. cabbage, kale, grated carrot, sugar snap peas, green beans)
Optional fresh herbs such as oregano and coriander leaves (cilantro)
Corn chips, or extra grated carrot
Cooked or sprouted beans
Optional extras such as avocado, vegan cheese, salsa, spring onion (green onion)
Method:
Mix the dressing in a large mixing bowl. Add the greens, veggies and herbs and toss to thoroughly coat. Put layers of the dressed salad, corn chips, beans and any extras on large plates and serve right away.
In the photo I’ve used lettuce, rocket (arugula), sugar snap peas, red cabbage, grated carrot, corn chips, cooked red kidney beans, and the basic cashew cheese from ‘Artisan Vegan Cheese’.
Homemade Saurkraut (raw)
Making saurkraut for the first time can be a little scary – most of the recipes call for at least two cabbages and a special fermenting crock. I wanted to try making it with just one cabbage using equipment that I already had, and this is what I came up with:

I found out about the ‘leave it alone’ technique of releasing juice from the cabbage through The Nourishing Gourmet, in this link she also provides directions for creating a weighted saurkraut without a special crock. The ‘leave it alone’ technique reminds me a little of making slow rise bread, where the slow rise does the job that a time-consuming knead would normally do. Salt is sprinkled on the cabbage and left for at least fifteen minutes, or as long as two hours, and this draws the liquid out in the same way that pounding it with a mallet would normally do.
Really fresh cabbage is important for this – it will make the best tasting saurkraut, and will keep longer in the fridge. I get really fresh local organic cabbage from a market and make this saurkraut on the same day, or the day after.
Quality salt is also essential. I use Himalayan crystal salt, which has larger grains than some other salts. If you’re using a more powdery salt then use less than I do. The best salts for kraut making are raw ones like the Himalayan one I mentioned above, along with Celtic Sea salt, Fleur De Sel and Victorian lake salt. Pure sea salt or pure rock salt will also do, but be sure to check the ingredients to make sure it doesn’t contain any “anti-caking agent” or any other additives.
Equipment needed:
•1 litre (1 quart) wide-mouthed glass or ceramic jar (this is just big enough to hold kraut made from a 1.2kg (2.6lb) cabbage)
•a glass, ceramic or plastic bowl with at least a 3 litre (3 quart) capacity
•1 or 2 wooden spoons, for placing the saurkraut in the jar and tamping it down
•A bowl or plate, for placing under the jar as it ferments
Ingredients:
•1.2kg (2.6lb) cabbage (this will just fit in a 1 litre (1 quart) jar, if in doubt, get a smaller cabbage or a bigger jar)
•salt – I use 2 teaspoons per 300g (10 oz) of cabbage before slicing, plus an extra teaspoon sprinked on top.
Method:
Remove the damaged outer leaves from the cabbage and weigh it. Note down the weight as this will determine how much salt to add.
Cut the cabbage into four wedges. Remove the core from each wedge as shown:

cabbage chopped into wedges, before coring

cabbage wedge with the tough core cut out
Thinly slice the wedges one at a time, add the first one to the bowl and sprinkle with salt (2 teaspoons per 300g (10 oz)), tossing around with a spoon or two to evenly distribute the salt. Repeat for the other three wedges, then sprinkle with an extra teaspoon of extra salt, for good luck.

Cover with a plate or some other non-metallic cover and leave to sit for at least fifteen minutes, or up to two hours.
Preferably using two wooden spoons, pick up some of the salted cabbage and press it into the jar. Keep adding more and tamping it down with each addition, to get the juice to come out and remove oxygen. Add more and more – the jar will fit a lot of cabbage in it when it’s pressed down, and finally if there is any cabbage juice in the bowl, pour this over the top. There should be a decent layer of brine on the top now, if there isn’t, try tamping it down more, or mix some salt into some water (maybe 2 teaspoons for half a cup) and pour this over the top so that the cabbage is covered.
Put the lid on the jar, place it in a bowl or plate and leave it in a cool dark place (but not too cold) to ferment. After the third day, open and close the lid of the jar every day to let the gas escape. I like how it tastes after four days of fermentation, when the saltiness has mellowed and there is a slight sweet lacto-fermented taste to it, but it is not too pungent. The saltiness mellows more after it’s in the fridge. Many kraut-makers prefer a longer fermentation time (usually around 10 days) but I find with vegan food 4 days of fermenting is fine. When it’s as fermented as you’d like it, move it to the fridge and it will keep well in there for quite a while.
After making one batch of this you might begin to understand why other recipes make such big quantities – it is really tasty, and healthy. Lacto fermented foods such as saurkraut are incredibly healthy and good for digestion. I like to serve saurkraut with shallow fried patties like the mushroom rissoles from Triumph of the Lentil, and a new chickpea patty recipe I’m working on (in the photo below with some red cabbage saurkraut, sweet potato oven chips, salad and homemade vegan mayonnaise). I imagine it would also be awesome with some seitan bratwurst like these ones, maybe served up with some kartoffelpuffer (my recipe is in Triumph of the Lentil).

I am always keen to hear new suggestions on recipes to enjoy saurkraut with, if you have a favourite soy-free vegan dish to serve it with please leave a comment so I can try it!
Quick and Easy Bok Choy (or Cabbage) and Chickpeas with Miso and Balsamic Dressing

Inspired by this recipe I bought some bok choy and adapted the recipe into a main course to feed two hungry people. I imagine that this recipe would be also be really tasty using cabbage or broccoli instead of the bok choy.
The dressing is so savoury and delicious that I often now make a salad dressing based on it by mixing 3-4 teaspoons of olive oil, 1 teaspoon of balsamic vinegar, 1 teaspoon of miso and half a teaspoon of mustard in a salad bowl, then stirring through some raw salad greens.

Gluten-free option, low fat option, nightshade-free, onion- and garlic-free, soy-free option, under 45 minutes
Kitchen time 10 minutes
Serves 2
Ingredients:
Brown rice, or some other grain for two (I used 1 1/4 cups of rice)
1 large bunch of bok choy, or other greens
2 1/4 cups cooked chickpeas (1 1/2 400g (14oz) tins, rinsed and drained)
1/2 cup water
1 1/2 tablespoons mellow light miso*
1 1/2 tablespoons balsamic vinegar
1 tablespoon olive oil or water
Cook the grains. (For brown rice: Rinse and drain, then add 1 1/2 to 2 cups of water per cup of rice. Bring to the boil, reduce heat and simmer with the lid on 25-30 minutes, take off the heat and leave to stand for 10 minutes.)
While the grains are cooking, prepare your vegetables and chickpeas by rinsing and drying them. Chop the bok choy into pieces around 3cm (1 inch) long, placing the stems in a separate bowl from the more leafy parts. Make the dressing by combining the miso, balsamic vinegar and 1 tablespoon olive oil in a small bowl.
When the grain has been standing off the heat for 5 minutes, heat a heavy chef pan or stockpot over a high heat. When the pan is hot, add 2-4 teaspoons of olive oil and quickly throw in the bok choy stems first, then add the chickpeas and bok choi leaves. Don’t stir. Put the lid on and cook for 2 minutes without stirring or lifting the lid.
Add half a cup of water to the pan and stir through. Put the lid back on and cook for another 2 minutes. Taste some of the bok choy to see if it’s cooked enough and cook for a little longer if needed. Take off the heat and stir through the dressing. Serve right away on top of the grains.
*Miso is typically made from fermented soybeans, but there are people around that make soy-free miso. I used a soy-free (and gluten-free) chickpea and brown rice miso made by Blue Mountains Miso in Australia. In the US the South River Miso Company make some soy-free misos and can post worldwide.