Category Archives: self-sufficiency
Homemade Vanilla Extract
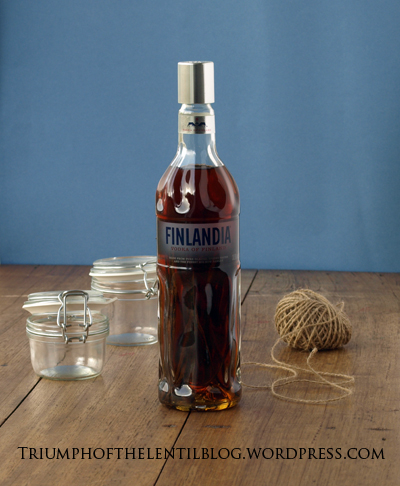
Good quality vanilla extract can be really expensive, and the shop I usually buy it from is often out of stock. But now that I know how easy it is to make at home, I’ll never buy it again. This recipe is so easy, and tastes even better than shop-bought extract.
If you buy organic vanilla beans in bulk (200g (7oz) of them is around 53 beans) it works out to be less than $5 for the vanilla beans, plus the cost of the vodka. Even using good vodka this ends up being half the price of what I used to pay for shop bought extract. (Cheap and nasty vodka will also work in this recipe).
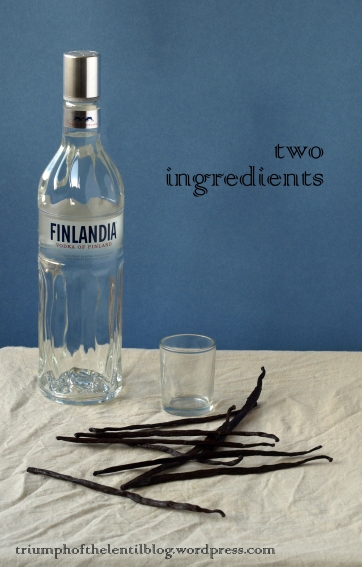
Ingredients:
Around 700ml (23oz) vodka
9 vanilla beans
Method:
Pour a little of the vodka out (around 1 or 2 shots worth), save it for later or drink it.
Slice the vanilla beans lengthways in half. Scraping out some of the pulp and adding this to the vodka will make for a stronger vanilla extract.
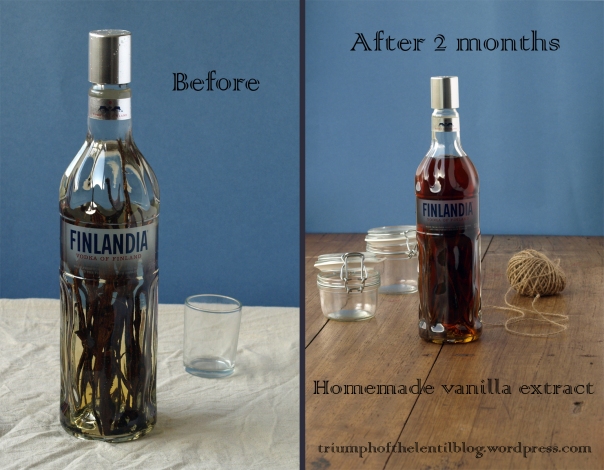
Carefully place the vanilla beans and the pulp in the bottle of vodka. Put the lid on and leave it to infuse in a dark cupboard for around two months. To speed up the process turn the bottle upside down, then right side up every so often…this means you can use your extract after a month.
When the vanilla extract is ready either remove the beans and put it into smaller bottles (it makes a nice gift), or simply keep it in the vodka bottle with the vanilla beans.
Zucchini and Tomato Chutney

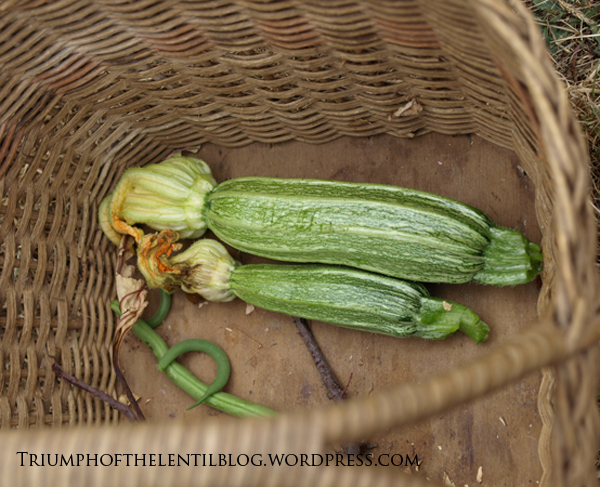
Most people that grow zucchinis in Tasmania seem to think the plants produce too much – I can never have enough of them – whether it’s grating them up and sneaking them into delicious chocolate mud cake, adding them to roast veggies for the last 10 minutes of roasting, grating and mixing them into a chickpea flour batter and frying as fritters, there are so many uses for them. Here is another way to use this vegetable, in a chutney that will probably keep for 12 months in the cupboard. It’s a small batch so if you’ve never made your own chutney before this is a nice one to try.
I’m growing costata romanesco zucchini this season (I think this is the third year in a row that I’ve grown it), it’s a really tasty Italian heirloom variety – so it’s GMO-free and easy to save the seeds.
costata romanesco zucchini
Making your own chutneys and sauces is actually really easy and affordable. With shop-bought organic chutneys and relishes often being ridiculously expensive with weird stuff like xanthan gum and anonymous ‘natural flavour’ added to them it can be worthwhile to make your own, even if you don’t grow any veggies.
I based this recipe with the same amounts of fruit, sugar and vinegar as a pumpkin chutney recipe from Good Home Preserving. With the right jar preparation the pumpkin chutney recipe keeps for 12 months, so I imagine that this one will keep well too. The trick is to sterilise your jars with heat before filling, and to tip them upside down after filling until they cool down. I use this same trick for jams and sauces.
The flavourings I use in this recipe are reminiscent of a typical English chutney or relish. Feel free to change the spices, as long as the main ingredients are the same this recipe will work.
Gluten-free, soy-free, low fat, sugar-free option
Kitchen time 10-15 minutes. Cooking time 1 hour.
Makes around 1100ml/1.1 quart/4 2/3 cups)
Ingredients:
300g (10.58oz) rapadura, sucanat, coconut sugar or raw sugar
300g (10.58oz) apple cider vinegar
700g (1.54lb) zucchini, diced
1 small carrot (or extra zucchini), diced (50-100g/1.76-3.2oz)
200g (7.05oz) diced tomatoes, or tomato purée/crushed tomatoes
50g (1.76oz) sultanas or raisins
1 clove of garlic, finely chopped
125g (4.4oz) onions, diced
1 1/2 teaspoons yellow mustard powder (or yellow mustard seeds, crushed in a pestle and mortar)
1/4 teaspoon ground black pepper
1/2 teaspoon ground ginger
1/2 teaspoon turmeric
1 heaped teaspoon Himalayan salt, or natural sea salt
3 cloves, ground (or 1/4 teaspoon ground cloves)
Method:
Rinse enough jars out with very hot water (preferably boiling). Place upside down, directly on the racks of a cold oven. Heat the oven up to 120c (250f).
Combine all the ingredients in a large saucepan or stockpot over medium-low heat. Stir every now and then until the sugar is dissolved. Bring to the boil, then reduce the heat and simmer, with the lid off, for around an hour.
When the chutney has finished cooking, bring a small pot of water to the boil. Add the pot lids or gaskets and boil for 30-60 seconds, carefully remove the lids and place upside down on a clean tea towel to dry.
Carefully remove the hot jars from the oven. Fill them up with the hot chutney (I place a wide-mouthed funnel over the jars and use a soup ladle to add the chutney). Screw the jar lids on tightly and turn upside down until thoroughly cold. Turn the right way up and store in a cupboard, it will probably keep for 12 months. It will taste best after it’s been in the cupboard for a couple of weeks, but it’s still good to enjoy right away. Once the jars are opened, keep them in the fridge.
Great served with mildly flavoured seitan sausages such as pumpkin seed, lentil and herb from High Protein Vegan, or burgers such as chickpea schnitzel patties or bean and sunflower seed rissoles from ‘High Protein Vegan’, or the lentil burgers from Triumph of the Lentil.

chickpea schnitzel patties from High Protein Vegan
P.S. I have more recipes coming up on this blog soon. To ensure that you get to see them subscribe to the mailing list on the right hand side of this page to get blog posts by email – I don’t send spam, just blog posts which are not that frequent and always have a recipe or something useful in them. Facebook is making it really difficult for blog pages to get news out to people that like the page, so even if you ‘like’ the Triumph of the Lentil Blog page, you may not find out about new posts unless you follow this blog by email or Twitter.
This post is a part of Wellness Weekend, Pennywise Platter, Wheat-Free Wednesday, Made from Scratch Monday, Waste Not Want Not Wednesday,
Magic Almost-Instant Sourdough
On a side note, the Kindle edition of my latest book is now out: UK, US, DE, FR, IT, ES, JP
This sourdough starter still takes a few days, but not nearly as long as other recipes, which typically call for feeding the sourdough for a week and throwing out a lot of the dough along the way. This is a waste-free sourdough that’s ready to use in 3 1/2 days.

Some tricks that make this sourdough extra fast:
Sourdough likes oxygen. For best results stir the mixture in between feeds to allow air into it, this will make it grow more quickly.
Rye flour. I’ve made sourdough with wheat in the past and had unpredictable and frustrating results. Rye has some special quality that makes it ideally suited for making sourdough.
I think that untreated water makes a difference. In the past I’ve used city water and the results haven’t been nearly as good. The chemicals that are dumped into mass water supplies probably aren’t great for growing wild yeast. For best results, use pure rain water or chlorine-free bottled water to establish the sourdough.
A bowl of warm water. I’ve never lived in a house that has that mythical warm rising place that most baking books seem to expect so I place the jar of starter inside a bowl, filling the bowl up with warm water to around the same level as the starter in the jar.
I use a 1.5 litre (1.5 quart) wide mouthed jar for my starter. The lid always remains unsealed, so that gasses can escape and the jar doesn’t explode. As you can see from the photo below, the starter has bubbled up and overflowed a few times after feeds – to prevent this happening, check it whenever you’re nearby and give it a stir if it looks like it’s near the top of the jar.

Day 1:
1 cup rye flour
3/4 cup cold water
Combine these ingredients in a jar or bowl. Place something over the top but do not seal, then place the jar in a bowl of warm water (not too hot, test it on your wrist to check that it’s a comfortable temperature).
Day 2 (around 24 hours later), add:
1 cup rye flour
3/4 cup cold water
Add this to the day 1 starter, and place the jar in a bowl of warm water.
Day 3, add:
2 cups rye flour
1 1/2 cups cold water
Add this to the previous days starter, then place the jar in a bowl of warm water.
In just 12 hours after day 3, the starter is ready to use.
This sourdough is really low maintenance once established. After removing 1 1/2 cups to make a batch of bread, just add 2 cups of rye flour and 1 1/2 cups of water to the starter and leave it on the kitchen counter for 24 hours to ferment. Once established it doesn’t need the bowl of warm water, and after it’s finished the 24 hours on the counter it can be kept in the fridge until the next time you bake. The trick to having a low maintenance sourdough is to just make bread with it at least once a week, that way feeding the starter can easily be done at the same time as mixing dough, and it doesn’t become an extra chore or involve any waste.

A Sourdough Bread Recipe for Baking in Loaf Pans
(suitable for Romertopf pans, and other similar-sized ones for 750g (1.65lb) loaves)
Kitchen time 5-10 minutes
Rising time around 24 hours
Baking time 1 hour
Makes 2 large loaves
I will admit that the taste of this isn’t as good as a hand shaped loaf baked on a preheated pizza stone, but lately I have been enjoying baking with ceramic loaf pans – it means I can make 2 large loaves at the same time, rather than if I hand-shaped this amount of dough it would mean having to bake the loaves separately. Hand shaped loaves baked on a preheated pizza stone will take less time to bake, just flip the loaf over after around 40 minutes, knock on the base and if it sounds hollow then it’s ready – for the best results with hand shaping, use wheat flour in stage one instead of rye flour.
If using a ceramic loaf pan, allow the bread to cool before removing from the pan. To remove the bread I slide a bread knife in completely around the loaf, pressing the loaf away from the pan as I go. I then use the bread knife as a lever to lift the loaf out of the pan. To easily clean ceramic baking pans, leave them to soak in hot water for a while.
Stage 1:
1 1/2 cups sourdough starter
1 1/2 cups cold water
2 cups rye flour
Combine all ingredients in a mixing bowl of around 7 litre (7.39 quart) capacity. Cover with a tea towel and leave to sit at room temperature for around 12 hours.
Stage 2:
4 1/2 cups cold water (use only 4 cups if using spelt flour)
3-4 teaspoons salt
9 cups wholemeal wheat or wholemeal spelt flour
Mix the water and salt into the starter dough from stage 1. Thoroughly mix through the flour. Cover with a tea towel and leave to sit at room temperature for around 12 hours.
Stage 3:
Preheat the oven to around 220c (430f).
While the oven is heating up, sprinkle the base of two large loaf pans with cornmeal or flour. Punch the dough down, knead for a few seconds, and divide into two pieces. Each piece can be completely coated in sesame seeds (or other seeds) if you wish, by covering a dinner plate in seeds, stretching the dough out into a flat circle to fit in the plate, folding the sides over into the middle, and placing this seam side down in each tin. Alternatively, just plonk the dough into the pans and sprinkle with seeds if you wish.
If your pans will fit in the sink, fill the sink partly up with warm water – the water should reach up most of the sides of the pans, but not flow into them. Leave the loaves to sit in the sink for around 20-40 minutes, until the oven has heated to 220c (430f).
Slash the top of the loaves with a knife and bake for around an hour.
Homemade Saurkraut (raw)
Making saurkraut for the first time can be a little scary – most of the recipes call for at least two cabbages and a special fermenting crock. I wanted to try making it with just one cabbage using equipment that I already had, and this is what I came up with:

I found out about the ‘leave it alone’ technique of releasing juice from the cabbage through The Nourishing Gourmet, in this link she also provides directions for creating a weighted saurkraut without a special crock. The ‘leave it alone’ technique reminds me a little of making slow rise bread, where the slow rise does the job that a time-consuming knead would normally do. Salt is sprinkled on the cabbage and left for at least fifteen minutes, or as long as two hours, and this draws the liquid out in the same way that pounding it with a mallet would normally do.
Really fresh cabbage is important for this – it will make the best tasting saurkraut, and will keep longer in the fridge. I get really fresh local organic cabbage from a market and make this saurkraut on the same day, or the day after.
Quality salt is also essential. I use Himalayan crystal salt, which has larger grains than some other salts. If you’re using a more powdery salt then use less than I do. The best salts for kraut making are raw ones like the Himalayan one I mentioned above, along with Celtic Sea salt, Fleur De Sel and Victorian lake salt. Pure sea salt or pure rock salt will also do, but be sure to check the ingredients to make sure it doesn’t contain any “anti-caking agent” or any other additives.
Equipment needed:
•1 litre (1 quart) wide-mouthed glass or ceramic jar (this is just big enough to hold kraut made from a 1.2kg (2.6lb) cabbage)
•a glass, ceramic or plastic bowl with at least a 3 litre (3 quart) capacity
•1 or 2 wooden spoons, for placing the saurkraut in the jar and tamping it down
•A bowl or plate, for placing under the jar as it ferments
Ingredients:
•1.2kg (2.6lb) cabbage (this will just fit in a 1 litre (1 quart) jar, if in doubt, get a smaller cabbage or a bigger jar)
•salt – I use 2 teaspoons per 300g (10 oz) of cabbage before slicing, plus an extra teaspoon sprinked on top.
Method:
Remove the damaged outer leaves from the cabbage and weigh it. Note down the weight as this will determine how much salt to add.
Cut the cabbage into four wedges. Remove the core from each wedge as shown:

cabbage chopped into wedges, before coring

cabbage wedge with the tough core cut out
Thinly slice the wedges one at a time, add the first one to the bowl and sprinkle with salt (2 teaspoons per 300g (10 oz)), tossing around with a spoon or two to evenly distribute the salt. Repeat for the other three wedges, then sprinkle with an extra teaspoon of extra salt, for good luck.

Cover with a plate or some other non-metallic cover and leave to sit for at least fifteen minutes, or up to two hours.
Preferably using two wooden spoons, pick up some of the salted cabbage and press it into the jar. Keep adding more and tamping it down with each addition, to get the juice to come out and remove oxygen. Add more and more – the jar will fit a lot of cabbage in it when it’s pressed down, and finally if there is any cabbage juice in the bowl, pour this over the top. There should be a decent layer of brine on the top now, if there isn’t, try tamping it down more, or mix some salt into some water (maybe 2 teaspoons for half a cup) and pour this over the top so that the cabbage is covered.
Put the lid on the jar, place it in a bowl or plate and leave it in a cool dark place (but not too cold) to ferment. After the third day, open and close the lid of the jar every day to let the gas escape. I like how it tastes after four days of fermentation, when the saltiness has mellowed and there is a slight sweet lacto-fermented taste to it, but it is not too pungent. The saltiness mellows more after it’s in the fridge. Many kraut-makers prefer a longer fermentation time (usually around 10 days) but I find with vegan food 4 days of fermenting is fine. When it’s as fermented as you’d like it, move it to the fridge and it will keep well in there for quite a while.
After making one batch of this you might begin to understand why other recipes make such big quantities – it is really tasty, and healthy. Lacto fermented foods such as saurkraut are incredibly healthy and good for digestion. I like to serve saurkraut with shallow fried patties like the mushroom rissoles from Triumph of the Lentil, and a new chickpea patty recipe I’m working on (in the photo below with some red cabbage saurkraut, sweet potato oven chips, salad and homemade vegan mayonnaise). I imagine it would also be awesome with some seitan bratwurst like these ones, maybe served up with some kartoffelpuffer (my recipe is in Triumph of the Lentil).

I am always keen to hear new suggestions on recipes to enjoy saurkraut with, if you have a favourite soy-free vegan dish to serve it with please leave a comment so I can try it!
Homemade Mustard
This recipe is really simple, and tastes even better than the mustard I was buying at the shop.
Ingredients:
6 tablespoons whole mustard seeds (I used all yellow this time. If you add some brown seeds to it, it will be spicier)
1/3 cup water
2 tablespoons apple cider vinegar
1/2 teaspoon salt
Mix all the ingredients together in a ceramic or glass bowl. Cover and refrigerate overnight.
Add 3-4 tablespoons more water and grind in a food processor or mortar and pestle until it’s the consistency you want. Add extra flavourings if you wish (or some turmeric if you want it to be bright yellow), transfer to a glass or ceramic jar and store in the fridge. It will keep for a few weeks this way.